Tuesday, November 20, 2012

Show Stoppers for Better Sales

I was reading an article by Ryan Jones on The Craft Report's site about Pricing for Better Craft Marketing.

In the article he mentions the we as artist should have very expensive pieces of our work for sale during our shows. I am not talking about marking up the price of one or two regular pieces. I am talking about creating what I call Show Stoppers. Those one of a kind, go hog wild, creations.

Ryan gives four reasons this is a good idea.  I will paraphrase:

1. Having a more expensive item for sale in your booth helps to increase the perceived value of your work.

2. It creates an item that collectors want to own. Even if they are not ready to own it yet, they will want to buy other pieces of your work, to begin or continue their collection until the can get that piece.

3. It will set you apart from other artists in your medium. If you are showing off this amazing creation, a customer is more likely to view you as a master of your medium, rather than just an artist selling their work. (Remember that perceived value thing?)

4. It establishes to the customer that your best asset is your craftsmanship. That your time is worth the money you are asking.


So I am sharing this article with you, because I wanted to share a story from my last show. This is the first show I have used a glass display case. This is not the first show stopper I have used, but it is the first show stopper that really worked.

Why did this one work, when others did not.

1. I did not skimp on this piece. 

I took my time and created something from my soul. I created it for the joy of creating it. Although I hope it sells one day, that was not the main focus I had when I made it.

2. The display. 

Previously, I would show a show stopper on a neck form. And it blended in with my normal stuff. Although my earlier show stoppers would get some attention, they were quickly forgotten.

With my new piece, I set it up as if it were on pedestal. I placed it in a glass top case, that gave the impression that it was expensive. I placed it on black velour so it would stand out! And I placed the entire case in where the sun would shine one it, so it would sparkle.

All of these small touches, made it stand out. And customers took notice.  I have a number of customers say "You have the best jewelry out here." I don't know if that is true or not, but I do believe the show stopper had a lot to do with hearing that comment repeatedly throughout the day.

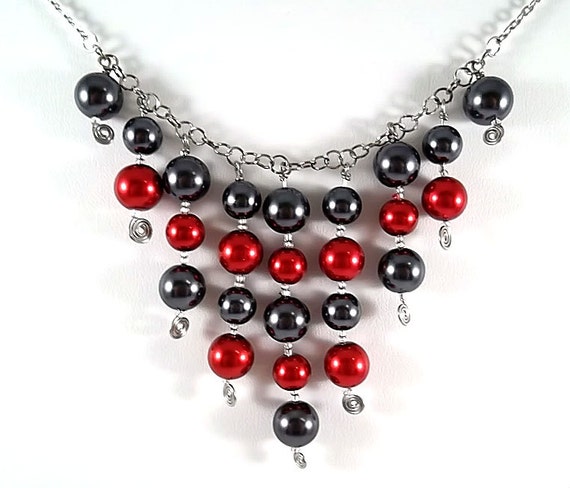
Here is a picture of my show stopper in it's case from my last show. I did not sell the show stopper, but I did sell two other pieces from that case!


Monday, November 19, 2012

I changed my earring cards!!!

I changed my earring cards.

Before I had a multitude of different cards. I used a different design for each type of earrings; hoops, stained glass, sterling silver, and general earrings. Here is a look at two of the cards I had been using.


I ordered new cards to create a more consistent look for my earrings. I chose two different cards. Both look the same, but there are two titles. One says "Reverse Hoop Earrings" and the other says "Artisan Earrings". I wanted to separate the reverse hoops, because I added instructions to the back of those cards.


 I think the new cards allow my earrings to stand out better than my old earring cards did.  Here is a visual comparison for you. 


Since I began doing craft shows, I have found that my customers really appreciate having the prices on each individual piece.  Many people do not feel comfortable asking for a price. So to that effort, I try to ensure that each piece has a price tag. (although there always seems to be one piece that escapes me at each show, but I guess that is life)

This show, I decided to expand on that. I chose to add a tag stating the earring hook's metal to each card. I created these tags buy printing the label on clear mailing labels.  I used 5 point font and was able to get 8 tags per label.


I cut each one and then put the label on to my earring cards. I really like how they turned out.


My customers really seemed to appreciate this. I hope you appreciated this blog post too!


Sunday, November 18, 2012

My Booth for Saturday November 17th

I have been updating the look of my booth this year.  If you would like to see my previous booth's from this year, you can find them here: http://elunajewelry-nc.blogspot.com/2012/11/if-you-cant-get-them-in-you-cant-get.html

My orginal booth layout called for a Z-Shaped table layout. However when I arrived at the show, I was told I was given a booth space at the corner of the walkway.  This spot was right next to the entrance.

That was too good of a spot to close off most of my booth. So I opted to open the booth on multiple sides, which meant that the Z-Shape would not work.

 One of the suggestions I was given when I started updating my booth was to use walls/curtains. This has the benefit of preventing customers from looking through your booth and missing your work.It also blocks the view of the booth next to you, so customers will not get distracted and move on.
 It feels a little anti-social, but it did help to focus attention on my work.

Yesterday was pretty windy. So in order to counteract the wind, I opted to use my sandbags. I will share a quick tip for using sandbags. When I first began using the bags, sand would go everywhere. A few shows back, I found some two gallon Ziploc bags and poured the sand into the Ziploc bag. I then placed the full Ziploc into the sandbag. Instant no mess sandbag for my tent!

 With my new look I opted to go for a neutral base color. I added black and dark brown displays. And finally to focus the eye on my necklaces, I added a bright pop of teal.

All in all, I felt like this color scheme worked. It is not overwhelming, and is somewhat inviting.


 I also added new earring cards to my displays. Before this show, I used a different base design for each type of earring. I decided to try to create a more consistent look with my earrings, so I had new cards made up.  After changing the cards, I feel like the earrings actually stand out better on the new cards.

This is the final new addition to my booth. I bought this front open shadow box from my local craft store. It has a neutral fabric insert that items can be pinned to. I wanted to use this shadow box to display my show stopper and more expensive pieces.

I bought a black velvet bracelet display to place my show stopper on. Man that thing sparkled yesterday.

I will say the necklace got a lot of interest in this display.

All in all, I think this look got a lot of positive attention. I did very well at this show. But there are a few tweaks I want to make.

First, I still need to work on my signage. Everything was tagged, but I did not have any signs to talk about my product. I really need to work on that.

Second, I would like to raise my tables up. Normally I do, but one of my four foot tables has straight legs with no cross bar, so I had no place to attach my leg extensions. My husband and I discussed it, and I think we are going to purchase another 4 foot table that has the cross bar. This will solve that issue.

Lastly, there are a few finishing touches that need to be done. For instance the rods holding up the shadowbox lid. Personally, I think I should paint them black to look more together.

I hope you guys enjoyed this look at my new booth. I would love to hear your thoughts or comments on this new look.

Have a great day,
April

Thursday, November 15, 2012

If You Can't Get Them In, You Can't Get Them To Buy.

An exercise in booth design and a review of my booth choices this year. 

So I have been trying a lot to update the look of my craft show booth this year.

At the beginning of the year, my booth looked like this:


As you can tell, it was dark, and sometimes mis-matched with the displays. It worked ok, but it did not pull in customers the way I wanted. So I  guess in reality, it did not work for me.


I decided to try a new look by summer. I went bright.


This booth was just too bright. I had a lot of people stop just outside the booth and look in, but not so many came in. I guess the color caught their eye, but it was a little intimidating with all that brightness.

I loved the teal, but I think it was just too much.


So I stopped. I thought back to when I had the most sales. What was different with my booth then? How did it look? How did it feel?

Here is the how my booth originally looked when I was doing well in sales, before I started changing everything.


The booth was just two tables, and it looked sloppy. But things sold. Customers came in, they were not intimidated to walk in and look.

The brown stands were lopsided, and they tipped over very easily. (I really should have worked harder on being consistent when I made those displays.)


So upon reflecting on the look that seemed to work best, I created yet another booth look.
I wanted to add more table space, but still create the feel that there is a table between the customer and myself. (Over the years I have seen customers feel more comfortable when there was a table between us during a show. I suspect that they like to remain on the outside, because there is less of a mental commitment to buy something if it feels like you are still window shopping, rather than entering a store.)

So in order to create the feel of window shopping, and at the same time maximize the table space I can use, I have opted to create a Z-Table pattern like these.


Here is a peak at the new look I have chosen. I feel like it provides levels, a feeling of window shopping, a calm neutrality, and it maximizes my chances to display my work. (Forgive the picture quality, these were taken during a setup run in my house, notice my son's Lightening McQueen Couch in the photo; lol)

It looks much better put together at a show. Just wish I had bought the camera and got photos during my last show.


Notice the neutral beige for my tablecloths. This color is very underwhelming and blends away so your focus is on the displays and jewelry, which is as it should be.

The teal color is strategically placed to draw your eye into the black displays which pop against the brightness of the teal.


I have the Z-shaped table which increases the room I have to display objects, but it also creates a path for my customer to follow into the booth.

I have also placed my earring spinners on the back table. Earrings tend to be a big seller for me, so I placed them visibly on the back table so that a customer will see all of my work on the way to the earrings, rather than just staying on the earrings as tends to happen.


I am also placing a rummage box just in front of the spinners on the middle table for customers to sift through.


 Finally, right behind the front table, I have placed a glass top shadow box. I will be placing my expensive pieces in this. Hopefully it will have people oohing and awing.


Hope you enjoyed this tour of my booth, from old to new. The new look was fairly successful during my last show. There is another show this weekend, and I hope it does as well at that show.

Wednesday, November 14, 2012

Twitter Tree 11-14-12


The Twitter Tree© will be hosted by a different shop M-W-F.


Instructions:
  •          Only 2 Items per person
  •          Each Tweet must contain the hashtag #retwt
  •          Only 1 other Hashtag may be used.
  •          Please include a brief description of your item in the tweet. 
  •    Keep your Tweet under 140 Characters (including spaces).
  •          No Mature Items
  •          Tweet Everyone’s listings. (It is not fair to others if you do not fully participate. Team Leaders do watch who is tweeting and who is not.)

Limit of two (2) hashtags

  Welcome Back! Let the Tweets Begin!


Today's Tweeting Items:

 
NEW! Exclusive Design! Red and Black Bib Pearl Necklace by @ElunaJewelry http://etsy.me/ZEdOPD via @Etsy #retwt #fashion
 

 NEW Holiday Jewelry! #Christmas Ornament Necklace by @ElunaJewelry http://etsy.me/ZoxLe5 via @Etsy #retwt #Xmas

Wednesday, November 7, 2012

Twitter Tree 11-07-2012


The Twitter Tree© will be hosted by a different shop M-W-F.


Instructions:
  •          Only 2 Items per person
  •          Each Tweet must contain the hashtag #retwt
  •          Only 1 other Hashtag may be used.
  •          Please include a brief description of your item in the tweet. 
  •    Keep your Tweet under 140 Characters (including spaces).
  •          No Mature Items
  •          Tweet Everyone’s listings. (It is not fair to others if you do not fully participate. Team Leaders do watch who is tweeting and who is not.)

Limit of two (2) hashtags

  Welcome Back! Let the Tweets Begin!


Today's Tweeting Items:

 
Everyone wants silver and gold! Two-Tone Silver and Gold Hoop Earrings by ElunaJewelry http://etsy.me/XNr70b via @Etsy #retwt #fashion


December #Birthstone Earrings! Sky Blue Topaz Crystal Earrings by ElunaJewelry http://etsy.me/P4FG9u via @Etsy #retwt #handmade